Introduction to CSS
By now, we’ve developed a solid understanding of our document structure, which tags to use correctly and where. But what makes the web pages you see across the Internet so vibrant and appealing? By the end of the lesson, you’ll gain a deeper insight into CSS and its role in improving the visual aesthetic of web pages.
What is CSS?
CSS (Cascading Style Sheets) is a stylesheet language that describes the way elements within an HTML document should be displayed. This means you can define styles for an entire website and apply them consistently across various web pages. In a way, it is like separating the design (handled by CSS) from its structure (handled by HTML). For example, you use a paragraph tag in HTML to define a sentence, but you use properties in CSS to set its colour, size, font, etc.
Why do we need CSS?
-
To create interactive visual effects: CSS allows you to control the look and feel of a website. From giving colours to headings to making animations transition through the screen, it gives you the freedom to improve the aesthetics of your site.
-
To create consistent and reusable styles: You can provide a more uniform appearance on your site by maintaining one global stylesheet. When you need to make a change, you only have to do it in one place.
-
To add responsiveness to a page: With CSS, you can make styles for different screen sizes, like laptops, mobile phones, etc, to adjust accordingly with the change.
Without CSS, websites would be texts on plain, white backgrounds.
CSS Syntax:
CSS operates by selecting HTML elements and applying styles to them. Before we delve into the syntax of CSS, it is important to know two fundamental concepts first:
Classes:
-
A class can be assigned to an HTML tag by specifying it as an attribute. For example,
<p class="highlight">This is a paragraph with a class.</p> -
Classes are a way to apply the same CSS styling to multiple HTML tags without individually having to target each one.
-
Let’s assume that the class ‘highlight’ has CSS code associated with it that highlights the content of every tag it is used with. It would be inefficient and time-consuming to write those lines of code every time some text needs to be highlighted. By simply using the ‘class=”highlight”’ on tags with content that requires highlighting, we use these lines of code to our advantage.
<p class="highlight">This is a highlighted paragraph.</p>

<h2 class="highlight">This is a highlighted heading.</h2>

<a class="highlight">This is a highlighted link.</a>
IDs:
-
An ID can be assigned to an HTML tag by specifying it as an attribute. For example,
<p id="highlight">This is a paragraph with an id.</p> -
IDs uniquely identify a specific HTML element. Unlike classes, each ID must be unique within a webpage.
-
They are used when you want to apply a one-of-a-kind styling to an element that you know won’t be repeated later on.
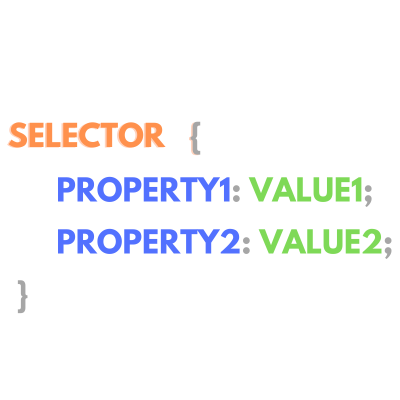
Moving on, CSS syntax is composed of four distinct things:
1. Selector:
-
A selector serves as the means to pinpoint the HTML elements you wish to style. It can take the form of a tag, a class, an ID, or a combination of these.
-
The notation for each type of selector is as follows:
-
Element Selector:
- Simply the name of the HTML element. For instance, ‘p’ selects all
<p>tags.
- Simply the name of the HTML element. For instance, ‘p’ selects all
-
Class Selector:
- Indicated by a period (’.’). For example, ‘.underline’ selects all elements with the ‘class=“underline”’ attribute.
-
ID Selector:
- Designated by a hash symbol (’#’). A ‘#underline’ selector corresponds to any element with ‘id=“underline”‘.
-
2. Declaration Block:
-
Following the selection of an element, you establish styling rules within a declaration block enclosed within curly braces ({}).
-
Example:
p {
	/* Declaration block */
}
3. Property:
- Within the declaration block, you specify the aspect of the element you wish to style, whether it be colour, size, positioning, or any other attribute you intend to modify.
4. Value:
- Following the property, you define the desired value for that property. This value could represent ‘blue’ for color, ‘left’ for alignment, or any customisation required to suit your preferences and requirements.
We can specify multiple property: value pairs inside a declaration block simply by separating them using a semicolon.
How CSS is added
CSS can be added to an HTML in three primary ways:
-
Inline CSS:
- Inline CSS is placed directly within an HTML tag using the ‘style’ attribute. The styles applied will only affect that specific HTML element.
- For example:
<p style="color: blue; font-size: 16px;">
	This paragraph has inline CSS.
</p>
-
Internal CSS:
-
Internal CSS is placed inside a
<style>tag within the<head>section of an HTML document. -
This is where you can define styles for classes, IDs, and elements for the entire file.
-
For example:
<!doctype html>
<html>
	<head>
		<style>
			p {
				color: red;
				font-size: 16px;
			}
		</style>
	</head>
	<body>
		<p>This paragraph has internal CSS.</p>
	</body>
</html>
-
-
External CSS:
-
All CSS styles are stored in a separate file with a .css extension.
-
You can link the CSS stylesheet to your HTML document using a
<link>tag in the<head>section. For example:
- In the same folder where your HTML file is located, create a new file called styles.css.
- Write your CSS styles to this file.
p { color: blue; font-size: 16px; } - Go to your HTML file and make the following changes:
<!doctype html>
<html>
	<head>
		<link rel="stylesheet" type="text/css" href="styles.css" />
	</head>
	<body>
		<p>This paragraph has external CSS.</p>
	</body>
</html>
-
Comments
You can add comments in CSS using /* _/. Comments are ignored by the browser and you can use them to document your code.
For example:
/_ This is a comment */
p {
	color: blue; /* This is an inline comment */
	font-size: 16px;
}
CSS Specificity
Specificity is a system used to determine which CSS rule should be applied when multiple conflicting rules target the same HTML element. If multiple declarations have the same specificity, then we apply the last CSS rule declaration on our tag. The concept of conflicting styles can be demonstrated through a simple example:
<html>
	<style>
		.color2 {
			color: blue;
		}
		.color1 {
			color: red;
		}
	</style>
	<body>
		<p class="color1 color2">Hello World!</p>
	</body>
</html>
When we run our code, you’ll notice that the paragraph will have a red color. This is because the class ‘color1’ has been declared after ‘color2’ and, hence, takes precedence. If you’re wondering which styles are applied where, we can make use of a 4-part decimal system that determines specificity by making use of weights. In this system:
- Elements (e.g p, div, span) and pseudo-elements (e.g. ::before) have a value of 1. This is the lowest specificity that can be given.
- Class selectors (identified through ‘.’ ), attribute selectors (identified through ‘[]’) and pseudo-classes (identified by ‘:’) all have a specificity value of 10.
- For ID selectors (preceded by ‘#’), we assign a value of 100.
- Inline Styles (all styles applied directly through the style attribute) are represented by the number 1000. They have the highest precedence.
Now all you need to do is add up the number of each type in our selector string. Once you obtain answers for conflicting target classes, the highest specificity value will override the other styles. However, it is important to know that in the case of equal values, we check what selector is written at the very end.
Assume you have code with the styles as follows:
.my-class p {
	color: red;
}

#my-id .my-class p {
	color: blue;
}
Which styling will affect a paragraph tag with the class ‘my-class’ and the ID ‘my-id’? Let’s figure it out with a straightforward approach.
In the first instance, the specificity value for .my-class, being a class selector, is 10. Now, for the second case, we have an ID selector ‘#my-id’ with a specificity value of 100 and a class selector with a value of 10. Added together, they make 110. Since this total is higher than the specificity value of the first set of styles, the styles from the second set will be applied to our paragraph tag and we see a blue text color.
Scenario: You are tasked with applying different combinations of styles to a generic HTML file so you can demonstrate what you’ve learned with clarity. Study the HTML file given below, and make the following changes to it:
- Make use of inline styling to color the second paragraph tag ‘blue’.
- Use an external CSS file called ‘styles.css’ to alter the font size of the third paragraph tag. You can use the property value ‘font-size’ and use a value of ‘32px’ where px refers to pixels. Don’t forget to place relevant links where required.
- Take the help of internal styling and place any style of your choice on the fourth paragraph. You can use any example we provided above or you can do a quick internet search to pick anything you like!
<!doctype html>
<html>
	<head>
		<meta charset="utf-8" />
		<meta http-equiv="X-UA-Compatible" content="IE=edge" />
		<title>CSS Practice Scenario</title>
		<meta name="viewport" content="width=device-width, initial-scale=1" />
	</head>
	<body>
		<h2>My CSS Journey</h2>
		<p>
			Hi everyone! I am a beginner at CSS, excited to show you what I have
			learned today.
		</p>
		<p>
			This paragraph has a blue background because I applied inline
			styling on it.
		</p>
		<p>
			This paragraph has a bigger size than the others through a style I
			imported from my styles.css file
		</p>
		<p>
			This is just a boring old tag that has internal CSS styling applied
			to it. At least it looks good!
		</p>
	</body>
</html>
Your code should look something like this:

Answer:
HTML File Content:
<!doctype html>
<html>
	<head>
		<meta charset="utf-8" />
		<meta http-equiv="X-UA-Compatible" content="IE=edge" />
		<title>CSS Practice Scenario</title>
		<meta name="viewport" content="width=device-width, initial-scale=1" />
		<link rel="stylesheet" href="styles.css" />
		<style>
			#p4 {
				text-decoration: underline;
				color: brown;
			}
		</style>
	</head>
	<body>
		<h2>My CSS Journey</h2>
		<p>
			Hi everyone! I am a beginner at CSS, excited to show you what I have
			learned today.
		</p>
		<p style="background-color: blue;">
			This paragraph has a blue background because I applied inline
			styling on it.
		</p>
		<p id="p3">
			This paragraph has a bigger size than the others through a style I
			imported from my styles.css file
		</p>
		<p id="p4">
			This is just a boring old tag that has internal CSS styling applied
			to it. At least it looks good!
		</p>
	</body>
</html>
‘styles.css’ File Content:
#p3 {
	font-size: 32px;
}
Conclusion:
The goal of this lesson was to provide a brief introduction to the world of CSS and its pivotal role in shaping not only the style of your websites but also the perception of your clients to your site. An important part of web development is knowing when to make the right internet search for your problem and navigating through all the solutions. We suggest you practice with different scenarios to help you recall these concepts more clearly as you proceed.